Orchestration: Deployment
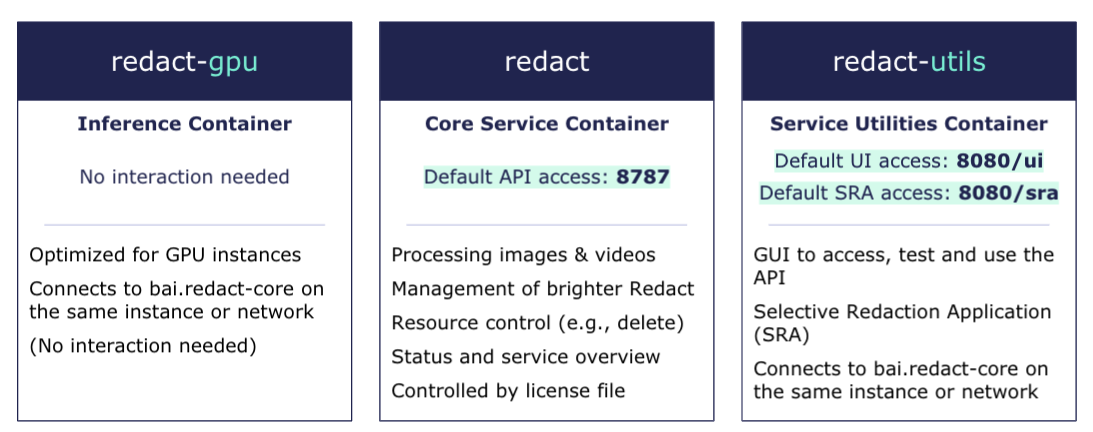
This guide walks you through deploying brighter Redact Enterprise Orchestration on a single machine. Orchestration simplifies the deployment and management of the three brighter Redact enterprise containers (Core Service, Inference Container, and Service Utilities) that form the backbone of our anonymization solution.
In this guide, you’ll learn:
- How to prepare your system for deployment
- How to download and configure the required software
- How to customize and manage your orchestration setup
Software Requirements
Before starting the installation, ensure the following:
- Your system meets all hardware and software requirements listed here: System Requirements (here)
- The software is supported only on Linux
Installation Guide
Brighter AI Redact Enterprise includes three redact containers managed by Docker Compose. Follow the steps below to deploy the solution on your machine.
- Download the Repository
- Clone the public GitHub repository, which contains all installation scripts:
git clone https://github.com/brighter-ai/redact-enterprise-orchestration.git - Navigate into the directory:
cd redact-enterprise-orchestration
- Clone the public GitHub repository, which contains all installation scripts:
- Add the License File
- Copy the license file provided by your Brighter AI contact into the cloned repository.
- Rename it to "license.bal"
- Example location:
redact-enterprise-orchestration/license.bal - Make sure it is readable by the container, e.g. set it to readable by all with
chmod 644or assign it to a group that the Docker containers are running under withchgrp.
- Docker Login and Download Images
- Log in to the brighter AI Docker registry to download the required images:
docker login docker.brighter.ai -u enterprise -p [password] - Replace
<password>with the credentials provided by your brighter AI contact. - Note: Before starting the container, please check the correct Redact Docker Images. You can find the documentation in the "Configuration Options" below.
- To start and stop the software, use the provided scripts in the orchestration directory:
- Start the Software:
./start_redact.sh - Stop the Software:
./stop_redact.sh
- Start the Software:
- This will automatically download and deploy the necessary Docker images.
- Log in to the brighter AI Docker registry to download the required images:
Configuration Options
You can adjust the configuration by editing the docker-compose.env file in the repository.
- Adjust Redact Docker Images
-
Modify the image versions to match the GPU-optimized container versions listed in the GPU Optimized Container Tab. Example variables:
REDACT_IMAGE=[redact_image_version]REDACT_GPU_IMAGE=[redact_gpu_image_version]REDACT_UTILS_IMAGE=[utils_image_version] -
A list of available images can be found here and here.
For the GPU-optimized images: always select the image that matches the specific GPU model. If that is not possible, use the image optimized for the Ampere architecture for all GPUs like RTX 30XX/40XX/50XX and for any GPU with an “A” in its name.
-
- Port Configuration
- Set API and UI ports:
REDACT_API_PORT=[desired_api_port]
REDACT_UI_PORT=[desired_ui_port]
- Set API and UI ports:
- License Directory
- Adjust the location of the license file as needed. Default is within the redact-enterprise-redaction container:
REDACT_LICENSE_FILE="license.bal"
- Adjust the location of the license file as needed. Default is within the redact-enterprise-redaction container:
- GPU IDs
- Specify the GPUs to be used by modifying the GPU_IDS variable. Examples:
GPU_IDS=0 # Use GPU 0
GPU_IDS=0,1,2 # Use GPUs 0, 1, and 2
GPU_IDS=all # Use all available GPUs - You can use the tool
nvidia-smito find out the GPU IDs for GPUs in your system.
- Specify the GPUs to be used by modifying the GPU_IDS variable. Examples:
Troubleshooting
If you encounter any issues during the installation or setup, please reach out to our team. We’ll assist you during the onboarding call to ensure a smooth deployment.
Updated 9 months ago